Pop Up Flower Card Ideas For Your Loved Ones

Handmade flower pop up cards are perfect for any types of occasion!

Pop up flower cards are a popular choice for card making and range from quick and easy card making ideas to much more elaborate and time-consuming.
Here are three pop up flower card ideas for you to try at home that card makers of all skill levels can try.
IDEA #1 - Unique planter box pop up flower card
This planter box pop up flower card is simple and oversized in design but takes a little time due to the number of individual flowers. So if you're not in a rush, this is a fun project to devote some time to or spread over a couple of shorter sessions.
What you'll need for this planter box pop up flower card:
1 x 12-inch x 12-inch (scrapbook size) card for the card base
1 x scrapbook size card or paper for the inside of the card
Scraps of paper for the flowers
Any embellishments you may like to add (I used buttons)
Scissors
Liquid glue/glue dots and a glue stick
Something to cut out flower shapes such as craft paper punches, a die-cut machine with flower-shaped dies, or a craft knife.
How you'll make this planter box pop up flower card
Start by folding the piece you intend to use for your card base in half to create a large oversized rectangle card.
You will see from the image below on the left that I used a piece of scrapbook paper that already has the words Happy Birthday on it.
If you would like to add some embellishments to the front of your card, go ahead and do that now. I've left mine as it is to focus on the inside of the card.
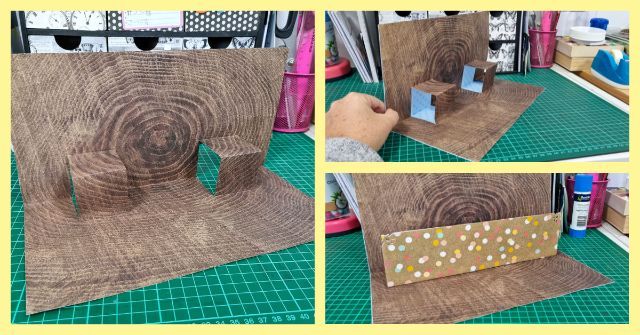
Now we'll move on to the inside of your card. My inside piece is a wood grain print which goes well with the vintage card scraps I plan to use for the flowers, which have a similar tone.
Fold your inside piece in half so that the pattern is on the inside and as per the photograph below on the right, mark four 2-inch lines along the folded edge at the 2-inch, 4-inch, 8-inch, and 10-inch points.
Next, snip along these lines with a pair of scissors.

As per the photograph below on the left, push these newly snipped sections inwards, making sure to fold the card flat and push on the creases to give them a smooth, neat finish.
The next task is to glue this entire inside sheet to the inside of your card base as per the photograph below on the top right.
Now for the planter box! You basically want to glue a rectangle of sorts onto the bits that stick out on the inside of your card to represent the planter box.
I have used a scrap piece of card in which I embellished the top corners with a decorative craft paper punch and brushed the edges lightly with brown ink.
The next part is the most time-consuming and fiddly as it involves making the flowers.
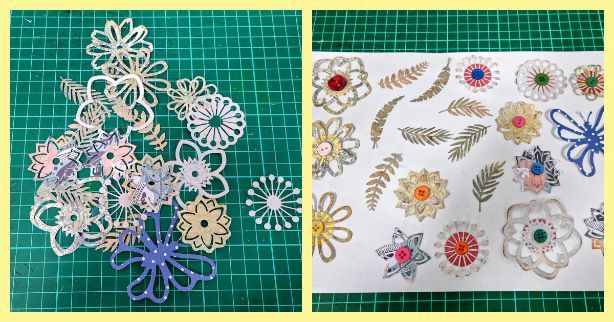
You may like to use a DIY printable, die-cut machine, pre-purchased flowers, or even use a craft knife. I used both a manual die-cut machine and a flower craft paper punch.
The below image on the left shows my flowers, leaves and a butterfly as they came out of the die-cut machine and the below image on the right shows my embellishments after I had finished them off with buttons and brown ink, which I brushed lightly on the edges and the surface of the leaves.
Now for the fun part ... gluing the flowers on!
Using either liquid glue or glue dots, arrange and attach your flower embellishments any which way you please.
Make sure you fold the card closed before gluing something down to make sure it's not going to stick out of the card when you close it.
After all, the planter box is a surprise pop up card in which you aren't supposed to see the flowers until you open the card.
My final product is shown below and although I haven't gone with traditional flowers for this project, it would look great doing so. I would love to see what you come up with!

A pop up greeting card that's a perfect gift for mother's day!
IDEA #2 - Blooming pop up flower card
This blooming pop up flower card is really cool as when the recipient opens the card, it unfolds from within itself creating a larger than expected surprise bloom of flowers.
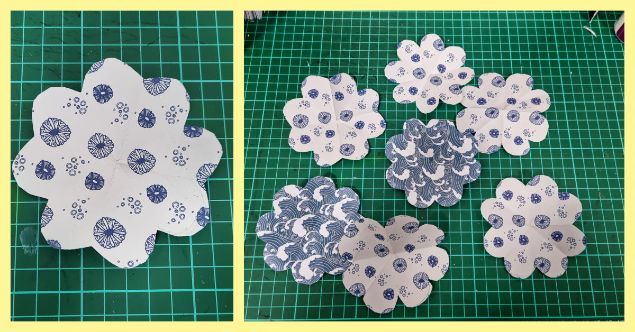
What you'll need for this blooming pop up flower card:
1 x card base
8 x small squares for the flowers around 8-inch x 8-inch
Liquid glue
Scissors
How you'll make this blooming box pop up flower card
Now, the instructions below may seem a little daunting, but I've taken a lot of photos for you to follow along with to make it easier.
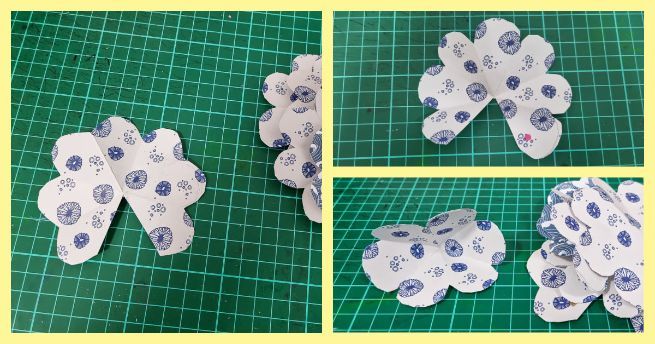
Start with one of your little squares (see the below photo on the left) and following the below photo on the right, fold the square into a triangle.
Now fold that triangle into a smaller triangle and then fold it again into an even smaller triangle.
You can see in the photograph that the second triangle from the right has a pencil line drawn on it in a vaguely petal-shaped.
Go ahead and draw the same on yours and then cut it out so you have a folded cone shape.
When you draw this petal on and cut it out, make sure the pointed end of the cone shape is where all the folds are in the paper with no raw edges as this becomes the middle of the flower when you unfold it.
Repeat this process seven more times with each of your paper pieces so that you have eight folded cone shapes.
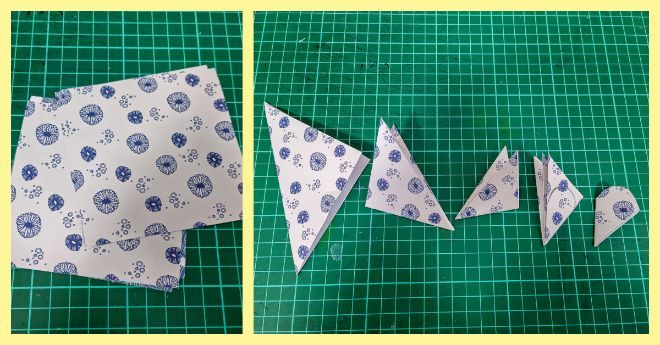
Now, unfold your work to reveal eight flowers with eight petals. Pretty neat huh!
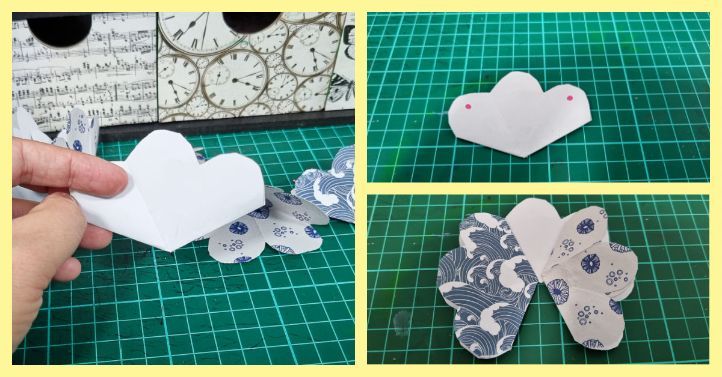
Next, cut one of your petals off as per the image below on the left.
See the pink dot on the image below on the top right? Go ahead and put a dot of liquid glue on this and then stick down the petal beside it on top, closing the gap and making a little cup-shaped flowers. (You don't need to put the pink dot on, it's there just to show you where to put the glue.)
Do this for your remaining seven flowers so that you have eight flowers in total, now with six petals instead of eight.
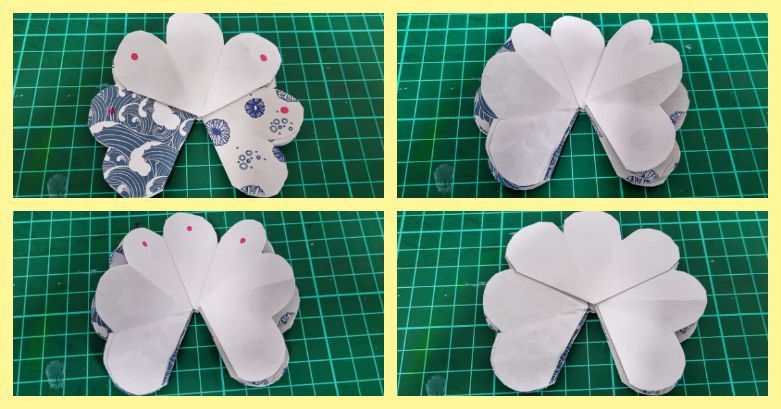
In the next step, take one of your flowers and fold it flat like in the image below on the left.
Repeat this for all of your flowers.
Now, do you see those pink dots on the image below on the top right? Place a dot of liquid glue on these pink dots on one of your flat flowers.
Again, you don't need to actually draw in the dots. They are just there to make these instructions easier to follow.
As per the image below on the bottom right, place two flat petals down on top and give them a gentle push to ensure they stick.
The same goes for the picture below. Place some glue where the three dots are and this time, stick one flattened flower on top.

Once again, the same goes for the picture below.
In the top two images, we place four glue dots and stick down two flat flowers.
In the below two images, we place three glue blobs and stick down the remaining flat flower.
Next, go make yourself a cuppa as this needs to dry for ten minutes.
Once the flower bloom is dry, place a dot of glue as per the below image on the left and stick it down to the inside of your card.
The placement will be similar to the image on the below right.
Again, place a dot of glue as per the image on the below right and close the other side of the card base on top, giving a gentle push to make it stick.
You're going to want to go grab a biscuit to go with that cuppa now as this needs to dry for ten minutes again.

This is the best part!
Once it's completely dry, slowly open the card and watch the bloom unfold from itself, enlarging to a fairly decent-sized flower bouquet.
It's amazing the way it folds back up with the closing of the card.
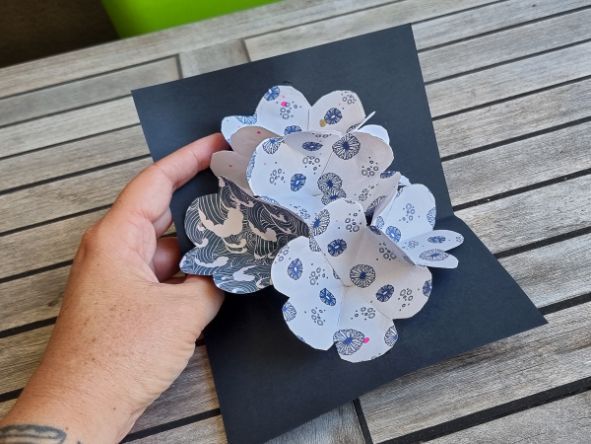
A beautiful black, blue and white pop up blooming card!
IDEA #3 - Simple pop up flower card
This simple pop up flower card is similar to the first idea in terms of how it's made however, this one is much simpler, smaller and takes less time to make.
What you'll need for this simple pop: up card
1 x cardstock 6-inch x 8.5-inch for the card base
1 x paper or card for the inside 5.5-inch x 8-inch
Glue
Flower stamps and ink
Color pencils or markers
Scissors
How you'll make this simple pop up card
Start by scoring your 6-inch x 8.5-inch card in the middle of the long edge (at 41/4 inches) and fold along this scoreline to create your card base.
Set this aside while we work on the inside of the card.
Grab your 5.5-inch x 8-inch paper/card and again, score at the halfway mark (at 4 inches) along the long edge.
As per the photograph below, fold in half along this scoreline and mark some lines ready for cutting and scoring.
The two cutting lines are each 1.5-inch in width, with a line 1 inch from the bottom of the card and another 2.5-inch from the bottom.
Cut and score where indicated in the photograph below.
Then, flip the card over and score again on the other side in the same spot.
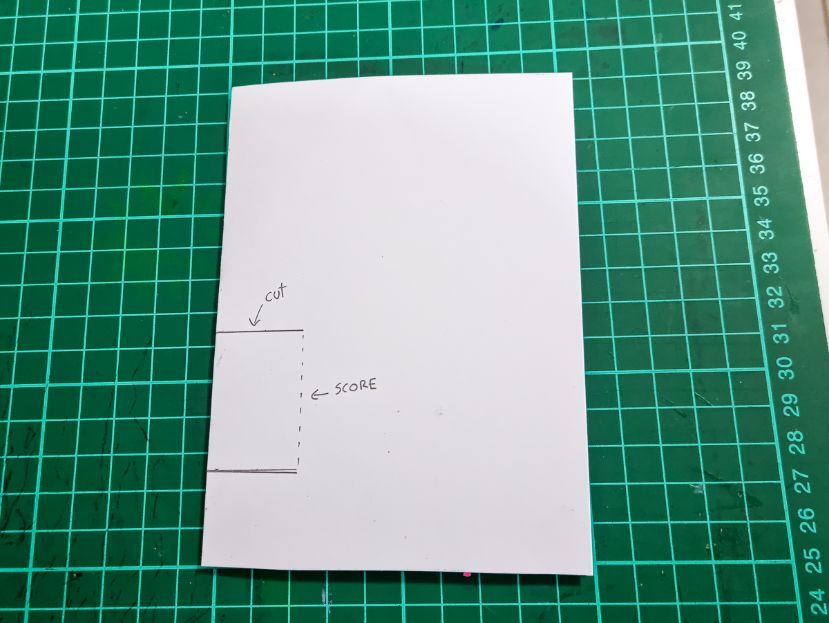
Gently push the newly cut section inwards and smooth out the edges with your fingertips.
Next, glue this inside piece on the inside of your card base just like in the images below.

The next step is to make the little flaps that go on the flower box.
Do this by cutting two small pieces of rectangle measuring 1.5-inch x 1-inch. Score and fold them in half so each side measures a half-inch like the photograph below.
Next, glue them in place on the flower box as power the picture below on the right. You may need to cut a smidgen off the length to make it fit but you should just be able to snip this without measuring if you need to do this.

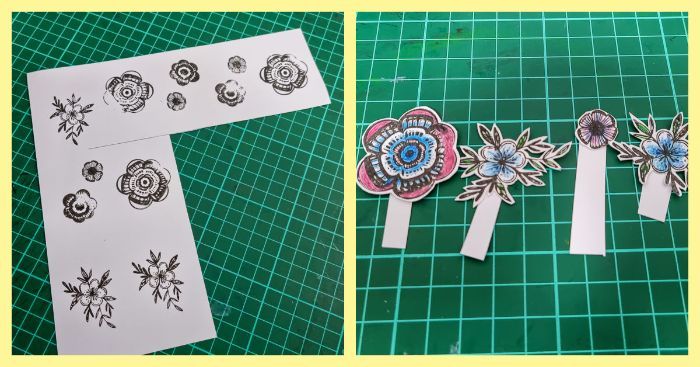
The next task involves working on the flowers.
Grab your flower stamps and stamp them onto some scrap paper. All you need to do now is colour them, cut them out, and glue them into your pop up card.
As you can see from the photograph below, I have glued a few of my flowers onto some scrap white card ''sticks'' to make them easier to display in the flower box.
As you glue in each individual flower, make sure to check that the card will fold closed without squashing the flower and open again easily.
It's best to check this flower by flower so that you can adjust it ASAP before the glue dries.
Here is my finished simple pop up flower card.
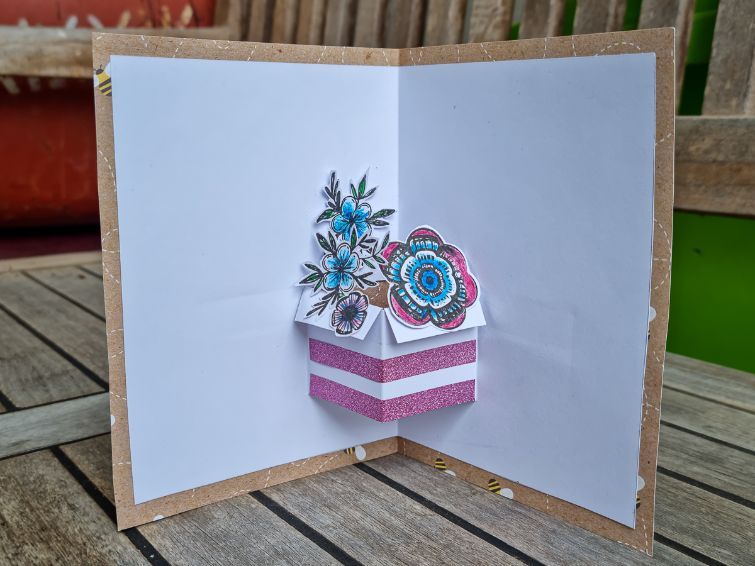
A simple and fun greeting card that your loved ones will surely appreciate!.
So ... How did you go?
How did your pop up flower card turn out? We'd love to see it as well as any other great pop up flower cards.
Happy cardmaking! 💗
Seen Our Sister Site?
Check out ScrapbookingCoach.com by clicking here.
© Copyright 2025 - CardMakingCollective.com