Simple Anniversary Card Ideas To Remember Your Years as a Couple


Celebrate your anniversary by with this 8 creative anniversary card ideas
Is there anything better than an I love you card for an anniversary? Well, maybe an I love you card with some jewelry in it, or at the very least, a bar of chocolate!
I'm always really excited to make an anniversary card, not just because it's in honor of such a positive and beautiful occasion, but because it's totally acceptable to go over the top with the mushiness.
Excessive use of my heart paper punch is forgiven with an anniversary card or I love you card, as is an overabundance of pinkish-red color schemes and pretty flowers.
If it's one thing the world needs more of it ... it's love. So with that in mind, here are eight versatile romantic card ideas for your anniversary to either show your love or to celebrate someone else's.
Don't worry, for those of you who don't like to go overboard with the hearts, I have toned it down and included some great options for you as well!
Happy Anniversary Card with Ribbons

A versatile card design that works well with any color schemes!
This anniversary card idea is really quite simple to make and is versatile enough that it would work as a romantic card or a couples card for Valentine's day with a simple change of wording.
Beginning with some light grey cardstock, I created my card base orientated with the fold at the bottom. I created some DIY printable banners in a variety of colors and after printing them onto cardstock, cut a number of them in different lengths. The DIY banners were stuck down onto the card vertically using a glue roller.
They have been arranged so that the longest is on the far left, with each banner getting shorter as it moves closer to the other side of the card. They also ''fade'' from a dark blue to a light blue as they move towards the other side of the card.
Another two strips of cardstock were stuck down horizontally on top of the banners using the glue roller. Finally, a piece of scrap ribbon tied into a cute bow has been glued down using liquid craft glue.
Although I'm not super confident with my handwriting, I felt that this message needed to be handwritten rather than created as a DIY printable, which is what I would usually do.
Counting Wedding Anniversary Greetings
A card design perfect for celebrating a couples wedding milestone
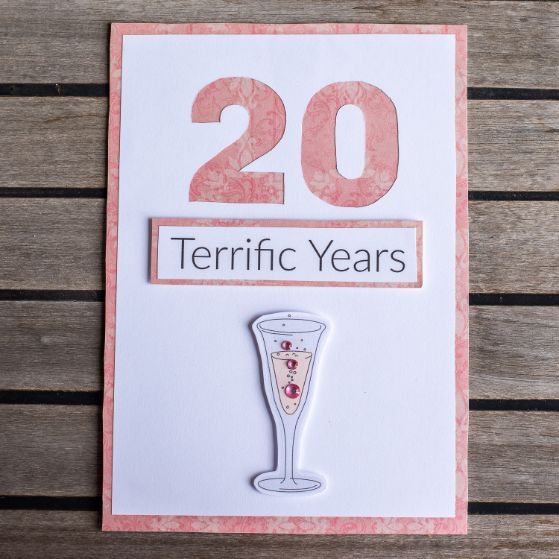
You can use this idea for commemorative anniversary cards, use a cut-out for the number of years being celebrated. To begin with, I chose a patterned cardstock for the base of the card.
The second layer will feature the cut-out and in this case, I have chosen to use white. The white card was cut slightly smaller than the card base so that once it's stuck down, the pattern will show around the edges like a border.
Number of years
I traced the number 20 onto the white card and cut it out using a craft knife. The white card was then adhered to the base card using a glue roller. Next, I included the words ''terrific years'' under the cut-out.
This was printed directly onto paper, which was glued to a scrap piece of my patterned cardstock base. The whole piece was mounted with foam squares to make it pop out a little.
Glass Embellishment
The champagne glass embellishment was a DIY printable which I printed directly onto cardstock and also adhered with double-sided foam squares to give it a little depth. As a final touch, some sticky gems were added inside the champagne glass to give it a little extra sparkle.
I made this especially for my parents as an anniversary greeting card and it made them so happy to celebrate their 20th wedding anniversary as well as their strong relationship that lasted through the years.
Anniversary Cards with Hearts
There is something about a grid format that is strangely satisfying to both make and look at! This anniversary card features not three, not six, but nine square embellishments glued down in grid format on the card, leaving a little space at the bottom for a sentiment.

Use glue dots or double sided foam squares to make a 3d heart embellishment effect!
Creating a handmade grid
Beginning with a cardstock base, the squares are layered in contrasting colors. Nine hearts were created with a simple paper craft punch and adhered to the middle of each square using double-sided foam tape to give them extra visibility.
Finally, the sentiment ''lots of love'' was handwritten in white paint pen to finish off the card. This anniversary card idea would also work as a romantic card or a couples card for Valentine's day!
Happy Frogs Cards Anniversary

A subtle yet elegant design using cut outs and textured card stock
This handmade card is super cute and uses dark blue cardstock as a night-time scene for the base of the card. I like that it also makes use of space for a minimalistic feel, something that I'm really enjoying lately. The seat of the swing and the frogs were hand-drawn onto sketch paper and cut out with a craft knife.
Next, the swing and frogs were stuck down to the cardstock base using double-sided foam squares to give it a little depth. Rather than draw the swing ropes on, I glued some twine down onto the paper, hiding the ends under the swing seat.
As a final touch, I hand wrote the sentiment reading ''love life, love you'' in white paint pen. It's simple but it really captures the special occasion. This is perfect to give to your husband since most men would prefer receiving simple anniversary cards.
Special 3D Anniversary Inspiration
This happy anniversary card encourages the celebration of an anniversary with a champagne glass theme. I began with white-colored cardstock as the base and cut out the brighter top layer slightly smaller so that when I eventually stick it down, the white will show around the edges like a border.

A layered card design with craft gem embellishments
Cut out design
I then drew a simple champagne glass shape onto the top colored layer using a pencil. This was cut out using a craft knife and the top layer was adhered to the white base using double-sided foam squares. The reason for this is that I want the champagne glass to have a little bit of depth as I will be ''filling it'' in the next step.
Gem collection decoration
Next, using stick-on craft gems, I three-quarters filled the champagne glass as well as placing some smaller ones above the glass to give the impression that the champagne is bubbling.
For the last step, a happy anniversary sentiment was created as a DIY printable banner and also adhered to using double-sided foam squares.
Layered Hearts for a Special Occasion
I love this wedding anniversary card design for its use of hearts down the side. I began this card with a white base and using heart craft punches of varying sizes, created a number of hearts that will eventually be stuck down the opening side of the card.

Overlap your embellishments to create a wonderful layered effect!
Layering the hearts
But before I glued them down, I laid out the hearts and worked out exactly how they were going to sit and where they were going to go. They needed to sit slightly to the left of the opening edge of the card. Using a light lead pencil, I then traced the outline of the right-hand side of the love hearts.
Next, I used my craft knife to carefully cut along the line I had just traced so that now, the opening edge of the card is shaped like hearts. The hearts I cut out earlier with the craft paper punch are finally stuck down onto the card in the same position as before. Some are stuck flat onto the card with glue tape and others are adhered to using double-sided foam tape to make them sit slightly higher.
The final touch is a DIY printable banner with the symbols XXX OOO (aka kisses and cuddles) stamped onto it. This was then mounted onto a bold colored piece of cardstock and stuck down onto the card using double-sided foam squares.
A great idea is to put as many hearts as the number of years you're going to celebrate your anniversary.
Celebrate Anniversary with Love
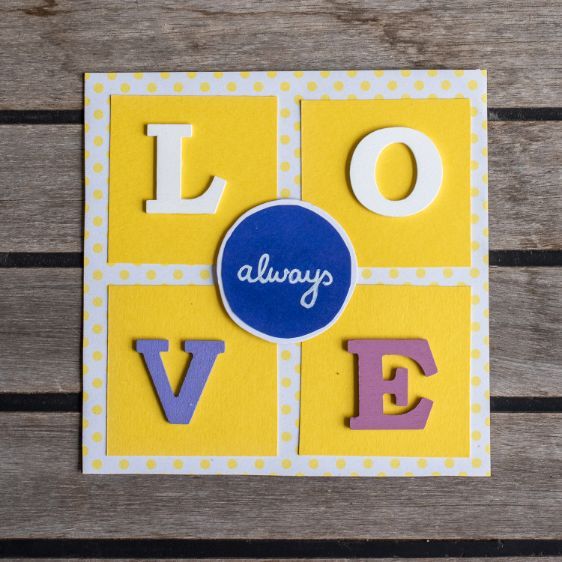
A simple card design using wooden letter embellishment!
Another strangely satisfying grid layout, although this one only features four squares. This anniversary card design begins with a square card made from cardstock. Four squares are cut from contrasting colors and glued onto the card using a glue roller.
Making the LOVE Grid
The letters spelling LOVE is a pre-purchased wooden embellishment from my local two-dollar store and I have stuck these down with liquid craft glue as they can be a bit stubborn. The middle sentiment and embellishment that reads ''always'' was created from both a blue and white piece of cardstock, with the word handwritten in white paint pen. This was adhered to with double-sided foam squares to make it pop a little.
This is one of my favorite happy anniversary greeting cards fit to give to your husband or even to your parents who are about to celebrate their anniversary. This is one of the cards that work well not just to greet your parents a happy anniversary but as another special occasion card as well. This design may spark an inspiration or different card making ideas that you can use.
Handmade Anniversary Cards

This beautiful card was made using stamps and stencils!
This card simply features the word love. Beginning with a light grey cardstock base, I have printed and cut out the letters LOVE and stuck them onto the card with temporary spray glue. They are going to be used as a reverse stencil of sorts so make sure however you stick them down is only temporary. The glue I used actually left dirty marks on my card so I think I will just use a small piece of blue tack next time.
With my stencil stuck down securely, I have used various stamps to fill in space around the words, making sure to stamp half on top of the words as well. I used the black ink, to begin with and then green to add a little interest.
Next, I walked away and made a cuppa to make absolutely sure it was dry before I touched it!
When I was 100% sure the ink was dry, I carefully lifted my letters off, revealing the word LOVE. The words were a little hard to read as I didn't fill in the space with stamps enough so I added in a little color with some Derwent pencils.
Have you made an I love you card or anniversary card yet?
I hope you have found some inspiration with these anniversary cards and I would love to see your version of them or any design with the same theme. The mushier the better!
Happy card making!
Seen Our Sister Site?
Check out ScrapbookingCoach.com by clicking here.
© Copyright 2025 - CardMakingCollective.com