


Card Making Ideas To Jumpstart Your
Creativity!
If there's one challenging thing about card making it's coming up with those dang ideas! Especially if you're working on a greeting card for someone, you want it to be special and unique.
Don't worry, we've got the inspiration to get you started!
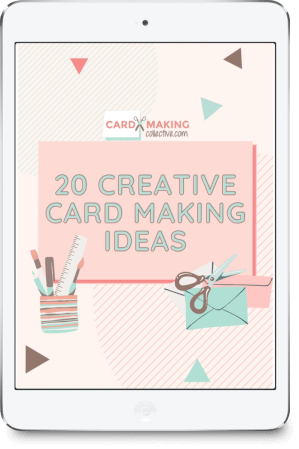
From simple DIY card design to clever techniques that set apart your greeting cards above the rest, we have it all inside our 20 Gorgeous Creative Card Making Ideas Guide!
Download it for free by clicking the button below!

Cardmaking Ideas To Inspire You!

Welcome to Cardmakingcollective.com!
Whether you're a complete newbie to card making or perhaps you've dabbled in a bit of paper crafting over the years, creating your own greeting cards is a wonderfully rewarding craft.
In my opinion, nothing beats the sheer joy of gifting someone a handmade card. On this site, we'll show you how to turn a plain bit of card stock into a wonderfully beautiful greeting card quickly and easily.
Be sure to check out our blog (which is perfect for beginners and advanced crafters alike) and discover a world of card crafting project ideas, techniques, and inspiration!

Welcome to Cardmakingcollective.com!
Whether you're a complete newbie or perhaps you've dabbled in a bit of paper crafting over the years, creating your own greeting cards is a wonderfully rewarding craft.
In my opinion, nothing beats the sheer joy of gifting someone a handmade card. On this site, we'll show you how to turn a plain bit of cardstock into a wonderfully beautiful greeting card quickly and easily.
Be sure to check out our blog (which is perfect for beginners and advanced crafters alike) and discover a world of card crafting project ideas, techniques, and inspiration!
If there's one thing card makers struggle with it's those dang ideas! Especially if you're working on a greeting card for someone, you want it to be special and unique.
Don't worry, we've got the inspiration to get you started!
From simple DIY card design to clever techniques that set apart your greeting cards above the rest, we have it all inside our 20 Gorgeous Creative Card Ideas Guide!
Download it for free by clicking the button below.


What You'll Need To Start!
To start crafting your own handmade cards, you'll need a few essential supplies:
♥ Stamps ♥ Ink ♥ Tape ♥ Ribbon ♥ Cardstock ♥ Crafting Paper ♥ Envelope ♥
♥ Pens/Drawing Tools ♥ Die cut stencil/ die cut machine ♥ Quality embellishments ♥
✂️ Card kits (Tip - Invest in quality beginners kit to save you time and money. Grab a few during special sale in craft stores and online art store)
✂️ Craft storage boxes (Tip - To keep your materials and growing collection of greeting cards neat and tidy, store them in see-through boxes!)
✂️ Die cutting machine (Tip - Die cutting machine and stencils are awesome tools to have for your handmade cards. They are not necessary for beginners but a couple of great die cutting machines worth investing in are the Cricut or Sissix Big Shot)
✂️ Die cutting templates / stencils (Tip - Alphabets and flower stencils design are a must-have basic!)
✂️ Art & Crafting shop nearby (Tip - Search, search, and keep searching online for the best deals in town! Start with Michael's, Jo-Ann, and Hobby Lobby!)
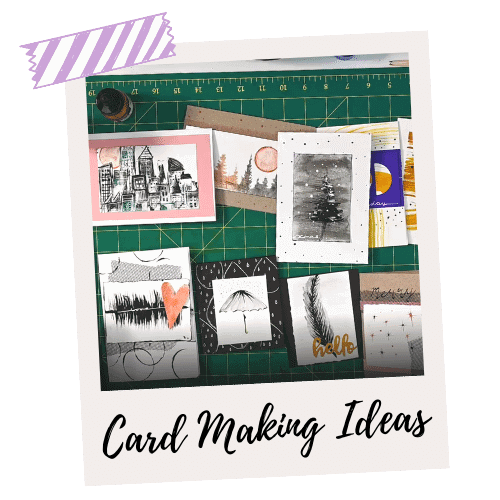
Need Card Ideas?
Getting started on a new card project? Perhaps a personal card for your family or friends as a handmade gift? Then you'll need ideas to create them!
Finding card ideas and inspiration isn't always easy. That's why we've put together some beautiful card making ideas for you to kick start your creativity.
✂️ Learn basic card making techniques (Tip - Experiment on your cards with different techniques like stamping, embossing, cutting, and more. Check out our blog for other techniques!)
Check out our card making ideas guide!

Need Help With Card Making Supplies?
Lost on where to start with your card making supplies? Do you buy a stamp and cardstock first? Or envelopes and glue dots? Or wait, maybe it's paper??
Don't fret, we'll show you what supplies you'll need to get yourself totally set up for your handmade card and paper crafting projects before you the whole store!
✂️ Stamps (Tip - Grab a few rubber stamp, acrylic stamp, and create some diy stamps for your stamp collection.)
✂️ Ink (Tip - Save some cash by buying bundle materials! Sometimes ink comes in the pack with the stamps.)
✂️ Cardstock (Tip - Look for cardstock in packs - it's more affordable than buying single sheets.)
✂️ Tape (Tip - Tape is more than just for adhesives in the crafting world. Get some craft tape, deco tape, fabric tape, and washi tape!)
✂️ Dimension dots (Tip - Dimension dots can be useful for a lot of different card projects! Stock up on quality foam dots and glue dots!)
✂️ Ribbon (Tip - You can buy ribbon by the meter in most crafts store to build your beautiful collection!)
Check out our card making supplies guide!
Need Help With Card Making Titles?
Getting stuck on the right words or title for your card can be frustrating. Your card titles can pretty much make or break your card design.
Back in the day, coming up with your card titles can be a chore...but not anymore! Save yourself the hassle of spending hours on end to find the perfect sentiments to finish your cards!
✂️ Envelope (Tip - You can buy envelopes in packs at a craft store or you can create your own envelope and design them too!)
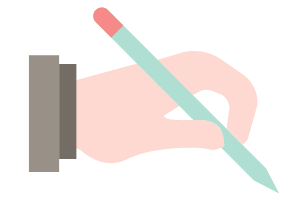
✂️ Pens / sharpies (Tip - There are a variety of pens to use for personalized drawing and writing your message on your greeting card. Make sure to get smear-proof ones!)
Check out our card making titles guide!
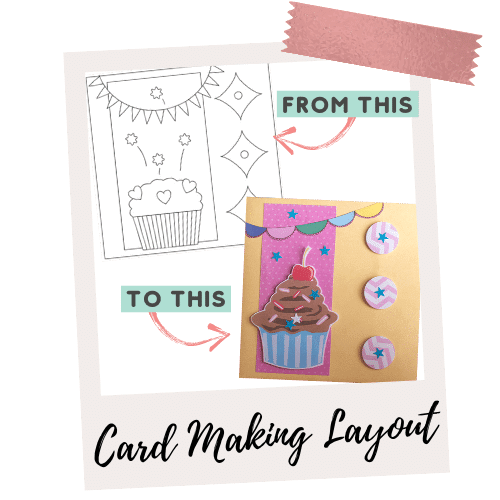
Need Help With Your Card Making Layouts?
When you're creating your own handmade cards, you will need card layout design! Card layouts are fantastic blueprints that give you a template to follow to create your card.
Crafting your personalized cards has never been this fun and easy! No more getting stuck on your craft projects with our card layouts!
✂️ Embellishments (Tip - You can buy them from a crafts store, create your own by using die cutting tools, or making them with paper and stamps! Handmade elements make your greeting cards more personalized!)
✂️ Craft Paper (Tip - Have plenty of craft papers for your card projects. Don't limit yourself to plain and patterned paper materials for more fun project.)
Check out our card making layout guide!
Seen Our Sister Site?
Check out ScrapbookingCoach.com by clicking here.
© Copyright 2025 - CardMakingCoach.com