Create Amazing Layouts Using Card Making Paper Punches

Use paper punches to create amazing card embellishments!
Card making paper punches are one of my favorite things to use when making cards. I don't have anywhere near as many as I would like but I'm slowly working on fixing that!
The reason I love card making paper punches so much is that they provide a very quick and precise cut out each and every time. I know that a Cricut or die-cut machine can cut more intricate shapes and letters however, I don't need to set anything up with a paper punch, and often I only need a simple shape.
When you first start, you are probably going to reach for that $10 pack of 4 punches rather than one punch for $40, right? With that in mind, I'm going to share with you 5 amazing layouts you can make using mainly simple card making techniques with paper punches that won't break the bank.

Use an edge paper punch for a pretty lace effect

Edge paper punches are also great for creating amazing border designs!
It's always handy to have a punch designed for fancy edges in your collection of card making paper punches. Often a bit larger than standard punches, edge punches cut a recurring pattern along the side of your card.
You can see in the example above, I have used an edge card making paper punch on strips of four different colors and layered them on the face of the card.
What you'll need
Edging paper punch
Card base
Four different colored scraps
Glue
Stickers for the words

This one is super simple to make! Decide what order you would like your colored card to be layered and cut your first piece so that it covers the face of the card around two thirds, leaving the top one third free to add some words later.
Go ahead and use the edging paper punch on one side of this first piece. You can see in the photo above that my edging paper punch cuts three of the pattern at a time. This means that I need to keep moving my paper along and recutting until the whole length is completely punched, making sure to line the paper up with the markings on the paper punch so that the pattern continues without fault.
Glue this first piece down and cut your next piece a little narrower before making it pretty with the paper punch. Glue this piece on top of your first piece, lining up the straight edge as per the photo of the card a little further up. Repeat this step for the last two pieces.
No go ahead and stick your word/letter stickers on and your card will be complete.
Make a pretty card with a fancy flower paper punch

Create intricate embellishment designs with zero effort by using decorative paper punches!
This layout uses a flower paper punch that is just a little bit fancier than a standard one. It's a simple design that is both quick and easy to make.
What you'll need
Flower paper punch
Card base
Colored paper for the flowers
Plain paper for the background
Double sided foam dots or squares
Glue
Sticky gem embellishments
Stickers for words

You can see in the photo above that I am using a mini paper stack for this project. You will need to choose three different patterned pieces for the flowers and you can see in the photo below that I have gone ahead and stuck my Happy Birthday sticker on the card base.

Using the flower paper punch, cut out 9 flowers (or however many you think you might need). Don't worry if you cut too many, you can just put these in your embellishment box for another project.
Before you stick the flowers onto your card base, glue down a strip of plain colored paper around an inch wide and place it as per the finished card photograph a little further up. Some of the flowers should then be glued down and some should be adhered using the double sided foam squares to give the project a little dimension.
Finish this card off by adding some sticky gemstones to the middle of the flower.
Use pretty butterflies to jazz up a trifold card

Try out some unconventional card folding designs with this lovely butterfly card layout
This project uses two different butterfly paper punches on a simple trifold card base. The punches used are a larger fancy butterfly and a cute little mini one that makes confetti-sized butterflies. These mini punches are great value for money and are often sold in a pack of four different shapes.
What you'll need
Large butterfly paper punch
Mini butterfly paper punch
Sheet of white card for the base
Glue
Plain paper for the background
Colored paper for the butterflies
Letter/word stickers
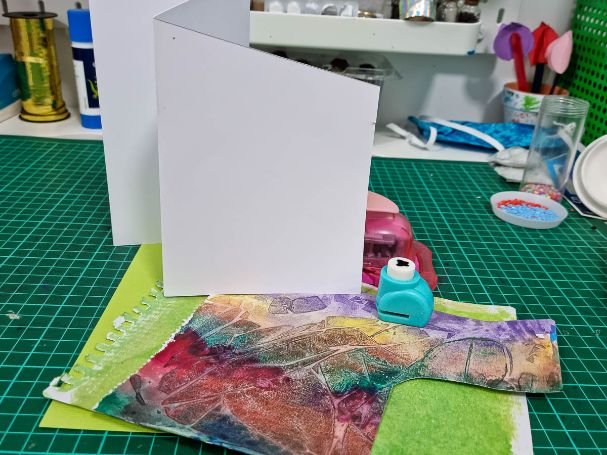
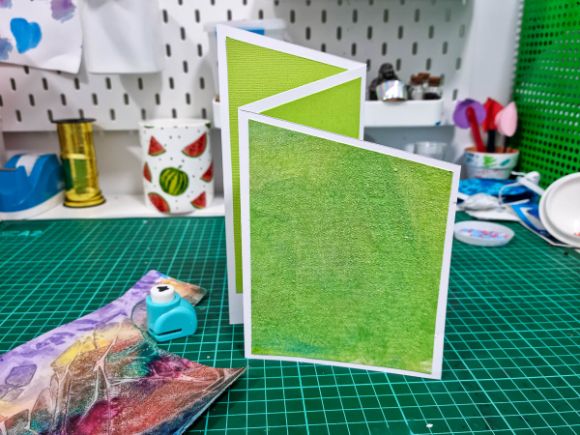
You can see from the photo above that the colored and some of the plain green card is a little textured. This is because they are scrap leftovers from an experiment with watercolor paint on watercolor paper. Although I had no use for them at the time, I loved the rough texture and the colors so they've been living in my scrap paper box waiting for their opportunity to shine.
Start by adding your plain card to your card base. I only had enough of the textured green for the front face so I have just used regular green card for the back two panels.
Next, using your large and small butterfly paper punches, cut out one or two large butterflies and multiple little ones from your colored paper. In my design, I actually cut out two large butterflies and layered them on top of each other. This allows me to kind of bend the wings up and add some interest to the card front. You can see this from the finished product photo back up the page a little.
Go ahead and glue your butterflies on how you see fit, leaving space to add your sticker. Finish this card off by adding your sentiment sticker.
Use a simple circle cutter for this quick design
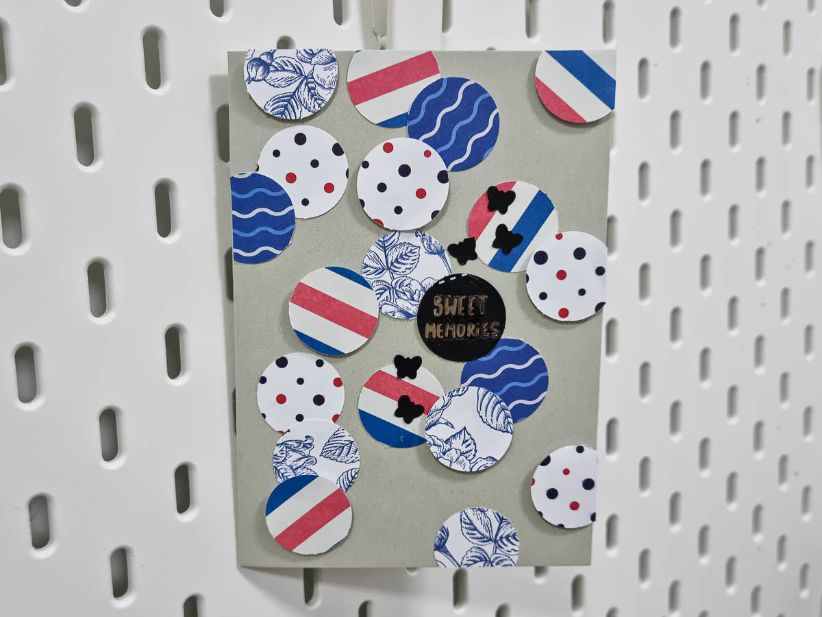
Create this beautiful card design by using different patterned papers of the same color scheme as embellishments!
This design is super easy and quick, using a circle paper punch and the mini butterfly punch from the previous project.
What you'll need
Circle paper punch
Mini butterfly paper punch
Coloured and plain paper scraps
Glue
Double-sided foam squares
Letter/word stickers
Card base
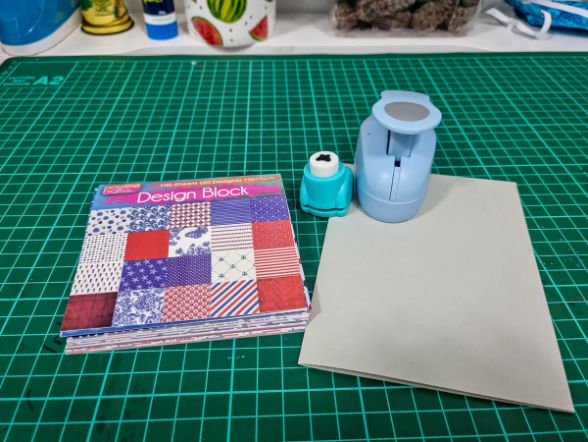
You can see the two paper punches that I have used in the photo below. As that the circles and butterflies are quite small, I'm using this small book of patterned paper. It measures in at only 4 inches x 4 inches so it's great for little projects like this. I chose three different patterns from this booklet and also used a small scrap of black paper.
Simply cut out a bunch of circles from your patterned paper and one extra one from a plain colored piece. This plain colored circle will be for your card sentiment and you can also use the plain colored card for your mini butterflies.
Glue half of the circles down flush onto the card base and the remaining half can be adhered with the double sided foam squares to give them a little pop. Add your word/letter stickers to the black circle and glue this down also, adding the mini butterflies around it.
Use simple heart paper punches for this cut out design
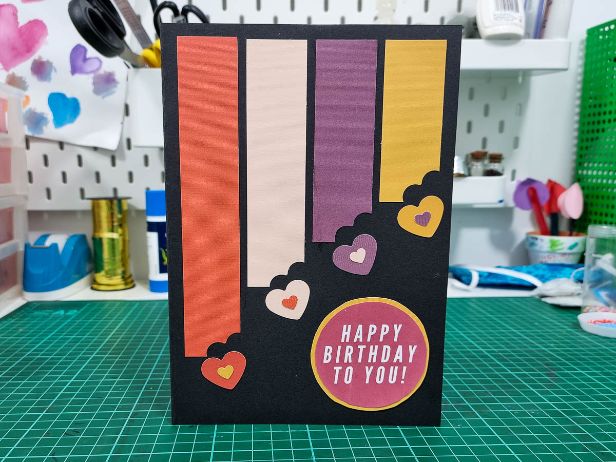
Experiment with different color combinations and discover amazing color contrast for your card designs!
This layout uses two simple heart card making craft punches, a mini one and a larger one.
What you'll need
Mini heart paper punch
Regular heart paper punch
Card base
Paper in four different colors
Word/letter stickers or a DIY printable sentiment
Glue

The image above shows the paper punches that I used and I chose my colors from this booklet of halloween/fall colored card.
As you can see from the finished card photograph, the larger heart punch has been used to partially cut out the bottom part of the four different coloured strips. The same size loveheart has been cut out in full and glued down underneath the strips on an angle. Next, the mini heart punch is used to cut out the smaller hearts which are then glued onto the larger hearts.
Finish this one off with your word/letter stickers or DIY printable sentiment.
Do you have a go-to card making paper punch that you just can't live without? We'd love to see some of your greeting cards made with card making paper punches.
Happy card making!
Seen Our Sister Site?
Check out ScrapbookingCoach.com by clicking here.
© Copyright 2025 - CardMakingCollective.com